
How to connect GA4
- Knowledge base
- Analytics
- Analytics integration
- How to connect GA4
Connect Google Analytics 4 (GA4) to Chat2Desk to track what visitors do in your website widget. Mark the actions that matter to you as key events, and you'll see which traffic sources bring people to your messengers.
1. Connect Google Analytics to your website
Make sure your website has both the Chat2Desk widget and the Google tag for your GA4 property. If you haven't set up analytics yet, follow Google's instructions.
To set up Chat2Desk, you'll need your Measurement ID. It looks like G-XXXXXXXXXX. To find it, open your property in GA4, go to Admin > Data collection and modification > Data streams and select your website's web stream. The Measurement ID is shown in the stream details.

2. Turn on data sending in Chat2Desk
Log in to Chat2Desk with an administrator account. Go to Settings > Web analytics and turn on data sending to Google Analytics. Paste your G-XXXXXXXXXX ID into the Tracking ID field.
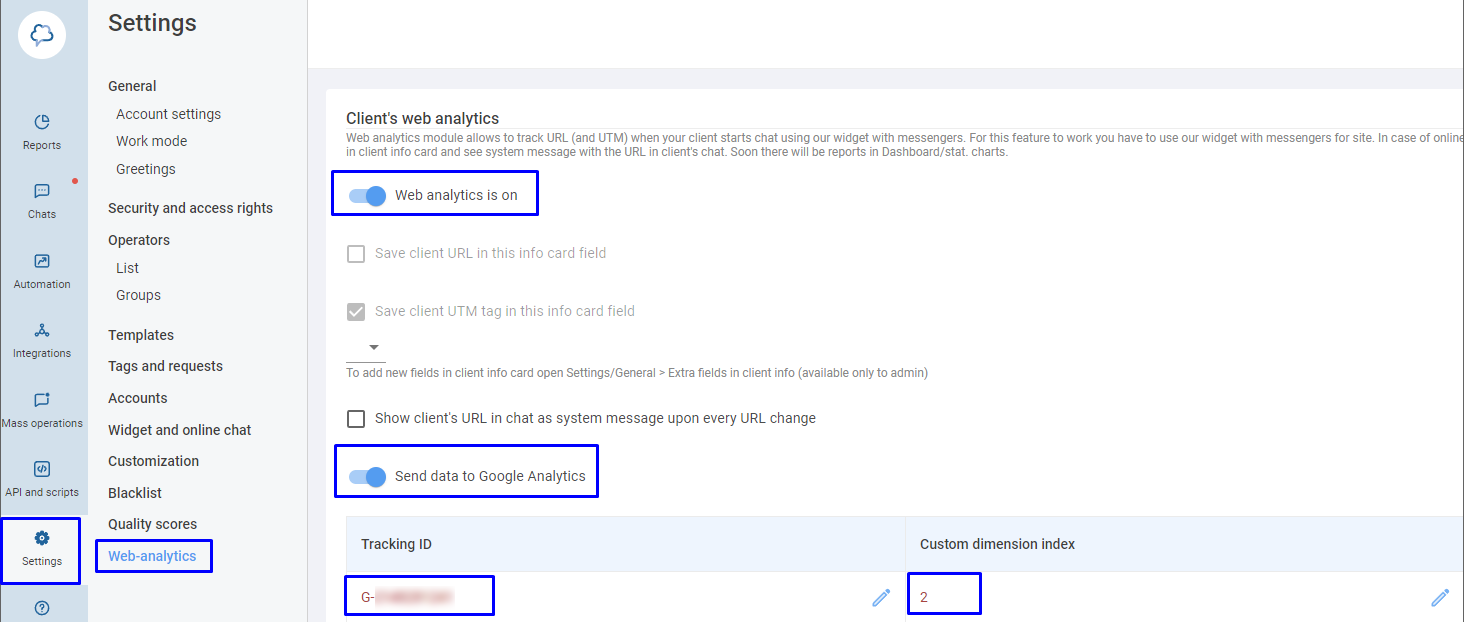
3. Choose the events to track
Decide which widget actions should count as key events. These could be clicks on messenger buttons, messages sent through the online chat, or both. To see which messengers you've connected, go to Settings > Channels and messengers in Chat2Desk.
| Messenger / action | Event name before October 2026 | Event name from October 2026 |
|---|---|---|
| WhatsApp Direct | WhatsApp Direct | |
| Telegram bot | Telegram | Telegram Bot |
| Viber Direct | Viber | Viber Direct |
| Facebook Messenger | Facebook Messenger | |
| External messenger | External channel | External |
| Online chat: click | Online-chat | Online chat |
| Online chat: incoming message | Online chat | Online chat incoming |
| VK | VK | VK |
| Viber Business | — | Viber Business |
| Viber Public | Viber Public | Viber Public |
| Odnoklassniki | ОК | Odnoklassniki |
| Instagram (i2crm) | Instagram (i2crm) | |
| WhatsApp Business API (Clickatell) | WhatsApp Clickatell | WhatsApp Business API (Clickatell) |
| WhatsApp Business API (Infobip) | WhatsApp Infobip | WhatsApp Business API (Infobip) |
| WhatsApp Business API (CM) | WhatsApp CM | WhatsApp Business API (CM) |
| WhatsApp Business API (SMS Traffic) | WhatsApp SMS Transport | WhatsApp Business API (SMS Traffic) |
| WhatsApp Business API (Wavy) | WhatsApp Wavy | WhatsApp Business API (Wavy) |
| Viber Business (Infobip) | Viber Infobip | Viber Business (Infobip) |
| Telegram Direct | Telegram User | Telegram Direct |
| WhatsApp Business API (Botmaker) | WhatsApp Botmaker | WhatsApp Business API (Botmaker) |
| Viber Business (SMS Traffic) | Viber SMS Transport | Viber Business (SMS Traffic) |
| WhatsApp Business API (360dialog) | WhatsApp Dialog | WhatsApp Business API (360dialog) |
| SMS (Infobip) | — | SMS (Infobip) |
| Viber Business (Devino) | Viber Devino | Viber Business (Devino) |
| Insta Official | ||
| WhatsApp Business API (Gupshup) | WhatsApp Gupshup | WhatsApp Business API (Gupshup) |
| WhatsApp Business API (Meta) | WhatsApp Direct | WhatsApp Business API (Meta) |
| VK Direct | VK Direct | VK Direct |
| Auto.ru | — | Auto.ru |
| MAX bot | MaxBot | MAX bot |
| SMS Direct (Voximplant) | — | SMS Direct (Voximplant) |
| SMS Business (Voximplant) | — | SMS Business Voximplant |
| Additional external messenger | — | Other external |
| Avito | — | Avito |
| Drom | — | Drom |
| SMS Business (SigmaSMS) | — | SMS Business (SigmaSMS) |
Clicking the online chat button and sending a message in the online chat are tracked as separate events. Online chat: click fires when a visitor clicks the online chat icon to open it. After that, Online chat: incoming message fires each time the visitor sends a message.
A dash means the event had no previous name. The actions available to you depend on your connected channels and widget settings.
If your integration is already set up, see Switching to the new event names (October 2026) below.
4. Mark events as key events
Open your website and perform the action in the widget, for example by clicking a messenger button. Then go to GA4:
- Open Admin > Data display > Events.
- Find the event on the Recent events tab or use search.
- Click the star icon next to it to mark it as a key event.
- Repeat for the other events you need.
New events can take a while to appear in the list. A key event mark applies only to new occurrences and doesn't recalculate historical data.
5. Check the setup
Once you've marked the events, perform the action in the widget again. Open the Realtime report in GA4 and check that the data has arrived. To test message tracking, send a message in the online chat.
A new key event can take up to 24 hours to appear in standard reports.
If no data comes through, check the following:
- The GA4 property you're viewing matches the ID you entered in Chat2Desk.
- The Google tag is installed and data sending is turned on in Chat2Desk.
- The key event name you marked matches the name the widget actually sends.
- The browser isn't blocking analytics, and the visitor has consented to data collection.
Use key events in your traffic source reports to compare which acquisition channels lead visitors to the actions you care about.
Switching to the new event names (October 2026)
This section is for you if you already collect data on widget actions in GA4. Compare the events you use with the table above. If an event's name hasn't changed, you don't need to reconfigure it.
For renamed events, you have two options: switch to the new names, or keep the old ones with a rename rule.
Option 1. Switch to the new names
- After the update, perform the action in the widget and check which event arrives in GA4.
- Open Admin > Data display > Events, find the event with the new name and mark it as a key event.
- If you use this action in Google Ads, create a conversion based on the new key event and check where it's used in your campaigns. Renaming the old conversion doesn't replace this step.
From then on, data will be collected under the new name, while historical data stays under the old one. Keep both names in mind when comparing periods before and after the update. Key event marks don't apply to past occurrences.
Option 2. Keep the old names
Set up a rule that replaces the new event name with the old one. For the Telegram bot, for example, the rule changes Telegram Bot to Telegram.
You'll need Editor access or higher to the GA4 property.
- Go to Admin > Data display > Events.
- Click Modify event > Create. If GA4 asks you to choose a data stream, select your website's web stream.
- In Modification name, enter a descriptive name for the rule, for example "Keep old Telegram name".
- Under Matching conditions, select the
event_nameparameter, the equals operator and the valueTelegram Bot. - Under Modify parameters, enter the
event_nameparameter and the new valueTelegram. - Save the rule.
The modification name is just a label for the rule. The rename itself happens through the event_name replacement. Create event won't work here: it creates an additional event based on the original one instead of renaming it.
The rule can take an hour or more to start working. After that, perform the action in the widget again and check that it's recorded as Telegram. Make sure this event is marked as a key event.
New occurrences will be recorded under the old name. The rule doesn't change data that's already been collected, including events that arrived under the new name before the rule took effect.
Chat2Desk documentation will use the new names from now on, so keep a list of the replacements you've set up. You'll need it when building reports or contacting support.
When an old name now belongs to a different action
After the update, some event names refer to a different channel or action:
| Event name | Before the update | After the update |
|---|---|---|
| WhatsApp Direct | WhatsApp Business API (Meta) | WhatsApp Direct |
| Online chat | Message sent in the online chat | Click on the online chat |
| Instagram (i2crm) |


